
題目:https://ctflearn.com/challenge/168
提示是 Wikipedia 和一組 IP 地址,原本猜測是訪問該 IP 地址取得進一步資訊,但測試後並無法訪問,而 Wikipedia 每次的編輯紀錄都會留下 IP 地址,因此朝這個方向嘗試,搜尋後即找到了對應 IP 地址的編輯紀錄,flag 也在該次編輯變更中。
題目:https://ctflearn.com/challenge/168
提示是 Wikipedia 和一組 IP 地址,原本猜測是訪問該 IP 地址取得進一步資訊,但測試後並無法訪問,而 Wikipedia 每次的編輯紀錄都會留下 IP 地址,因此朝這個方向嘗試,搜尋後即找到了對應 IP 地址的編輯紀錄,flag 也在該次編輯變更中。
題目:https://ctflearn.com/challenge/230
本題給了一段二進位的字串,因此猜測經過轉換後就能得到本題 flag,經過 binary to ASCII 轉換後,即能得到 flag。
題目:https://ctflearn.com/challenge/107
Where do robots find what pages are on a website?
看到此提示想到是網站的 sitemap,通常 sitemap 會列出網站可以訪問的所有網址清單,比如本網站的 sitemap,但經訪問 https://ctflearn.com/sitemap.xml 後,這是一個不存在的網址,因此這方向是錯的。
另一個可以告知爬蟲的是 robots.txt,訪問 https://ctflearn.com/robots.txt 後看到有一個 Disallow 的頁面,也正好符合另一個提示:
What does disallow tell a robot?
訪問 robots.txt 裡面 disallow 的頁面後即可拿到本題的 flag。
題目:https://ctflearn.com/challenge/309
本題標題提示是和摩斯碼相關的題目,且內文僅有摩斯碼,因此使用工具將其解碼以後便可得到 flag。
題目:https://ctflearn.com/challenge/192
本題題目中有提到是編碼,而再根據標題,原先猜測是 base62 的編碼,測試後無法正確解碼,因此改成 base64,就能順利得到本題的 flag 。
Base{NM} 的編碼主要用途是將二進位形式的資料轉換成可顯字元的文字,以用於傳輸等用途,可以參考維基百科的相關介紹:Base64、Base58。
題目:https://ctflearn.com/challenge/103
本題是一個 zip 壓縮檔,如果使用的是 Windows 系統,解壓縮後會看到一個 . 開頭的資料夾(.ThePassword),但如果是 Unix 系統,比如 macOS,解壓縮後透過 Finder 查看則預設不會看到此資料夾,因為開頭為 . 代表是隱藏的檔案或資料夾代,所以預設不顯示,如果是在 command line 透過 ls 來查看,則需要加上 -a 參數。
當知道怎麼查看隱藏的資料夾或檔案後,就可以在解壓縮的資料夾裡面找到 PDF 的密碼,進而找到本題的 flag 。
題目:https://ctflearn.com/challenge/115
本題的線索是「41 42 43 54 46 7B 34 35 43 31 31 5F 31 35 5F 55 35 33 46 55 4C 7D」,看起來很像是十六進位(hex)的一段文字,嘗試將 hex 轉成 ASCII 後,得到「ABCTF{45C11_15_U53FUL}」,也就是本題的 flag。
題目:https://ctflearn.com/challenge/96
檔案:
本題只提供一個圖片檔,那麼 flag 肯定在此圖片中,第一個想到可能藏資訊的地方是 EXIF,但並沒有看似 flag 的資訊。
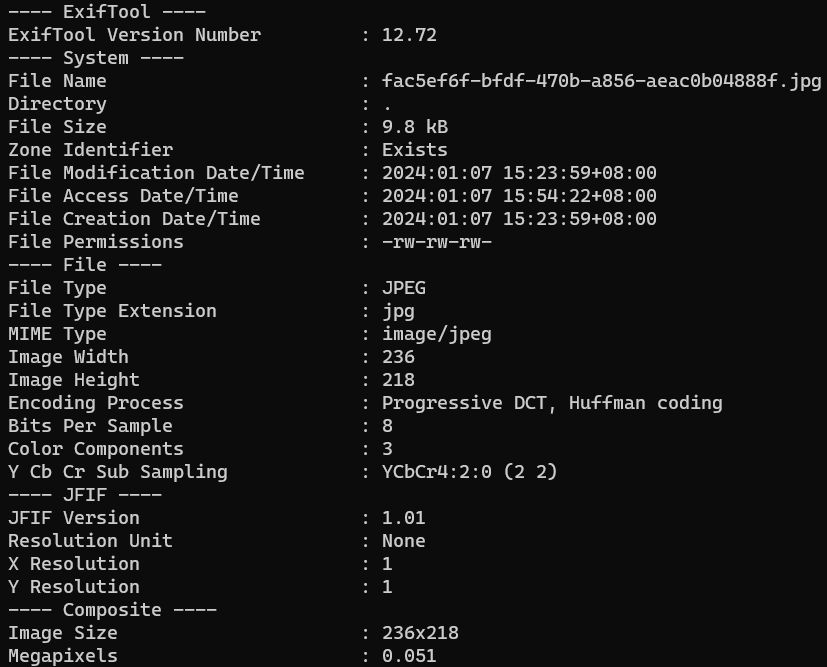
從 EXIF 沒找到 flag,下一步猜測可能是直接藏在 binary 中,因此透過 hex dump 等工具來直接查看檔案的 hex 值。
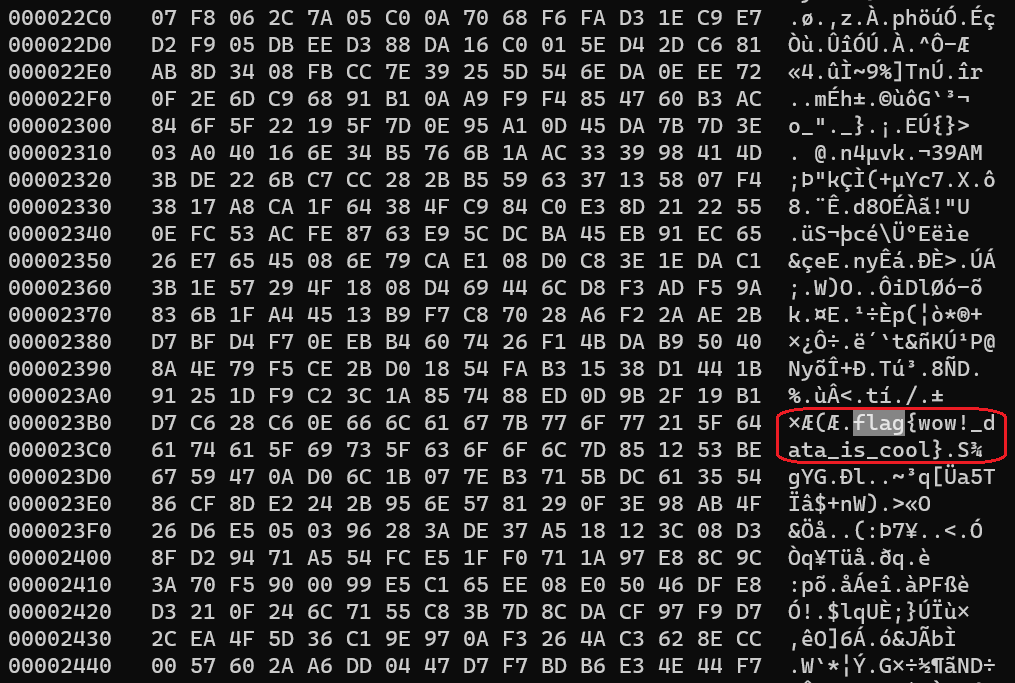
Bingo,找到 flag 了。
除了上述方式,還有可能透過 invisible watermark 來藏文字,但這就會因實作方式限制只有特定工具可以反解回來,比如:https://github.com/ShieldMnt/invisible-watermark。
題目:https://ctflearn.com/challenge/88
SELECT * FROM webfour.webfour where name = '$input'此 SQL 透過限定 name 來查詢資料,比如當 $input 是 Alice Bob 時,就會顯示 name 是 Alice Bob 的資料,因此可以猜測當 name 正確時,就能拿到本題的 flag。
因為使用者輸入的 $input 是以字串方式直接包含在 SQL 中,因此 $input 的值會成為最終執行 SQL 的一部分,此時就能透過特定 $input 來執行想要的 SQL。
在不知道正確的 name 前,讓 SQL 回傳所有資料同樣能達到目標,因此可以試著擴展 where 的條件,比如當 $input 是 ' OR '' = ' 時,執行的 SQL 會是 SELECT * FROM webfour.webfour where name = '' OR '' = '' ,where 的 '' = '' 對所有欄位都是 true,因此能拿到所有資料,也就能拿到本題的 flag。
On the AWS EC2 instance, increasing the volume is an easy task. You only need to adjust the size in the AWS management console and then extend the file system. That’s all. It is straightforward. There is also a step-by-step tutorial on the AWS document. However, decreasing an existing volume can become a nightmare.
You will feel helpless if you have to use Google to search for related problems. Many articles discuss this issue; however, almost none can work without issues, and I have also suffered from this before.
After reading many articles and doing lots of research, I finally managed to decrease the EC2 volume successfully and verified that it was working on an existing instance. I hope this article will save your life.
💡 The tutorial was only tested on Ubuntu Server 22.04; other OS or versions may not work and may encounter issues.
In this tutorial, we will demonstrate how to reduce the size of an Amazon EC2 volume from 30GB to 20GB on an Ubuntu Server 22.04. Our approach involves creating two auxiliary storage instances and utilizing them to transfer the data. Subsequently, we will modify the boot configuration to guarantee a successful startup when the disk is mounted back to the original instance.
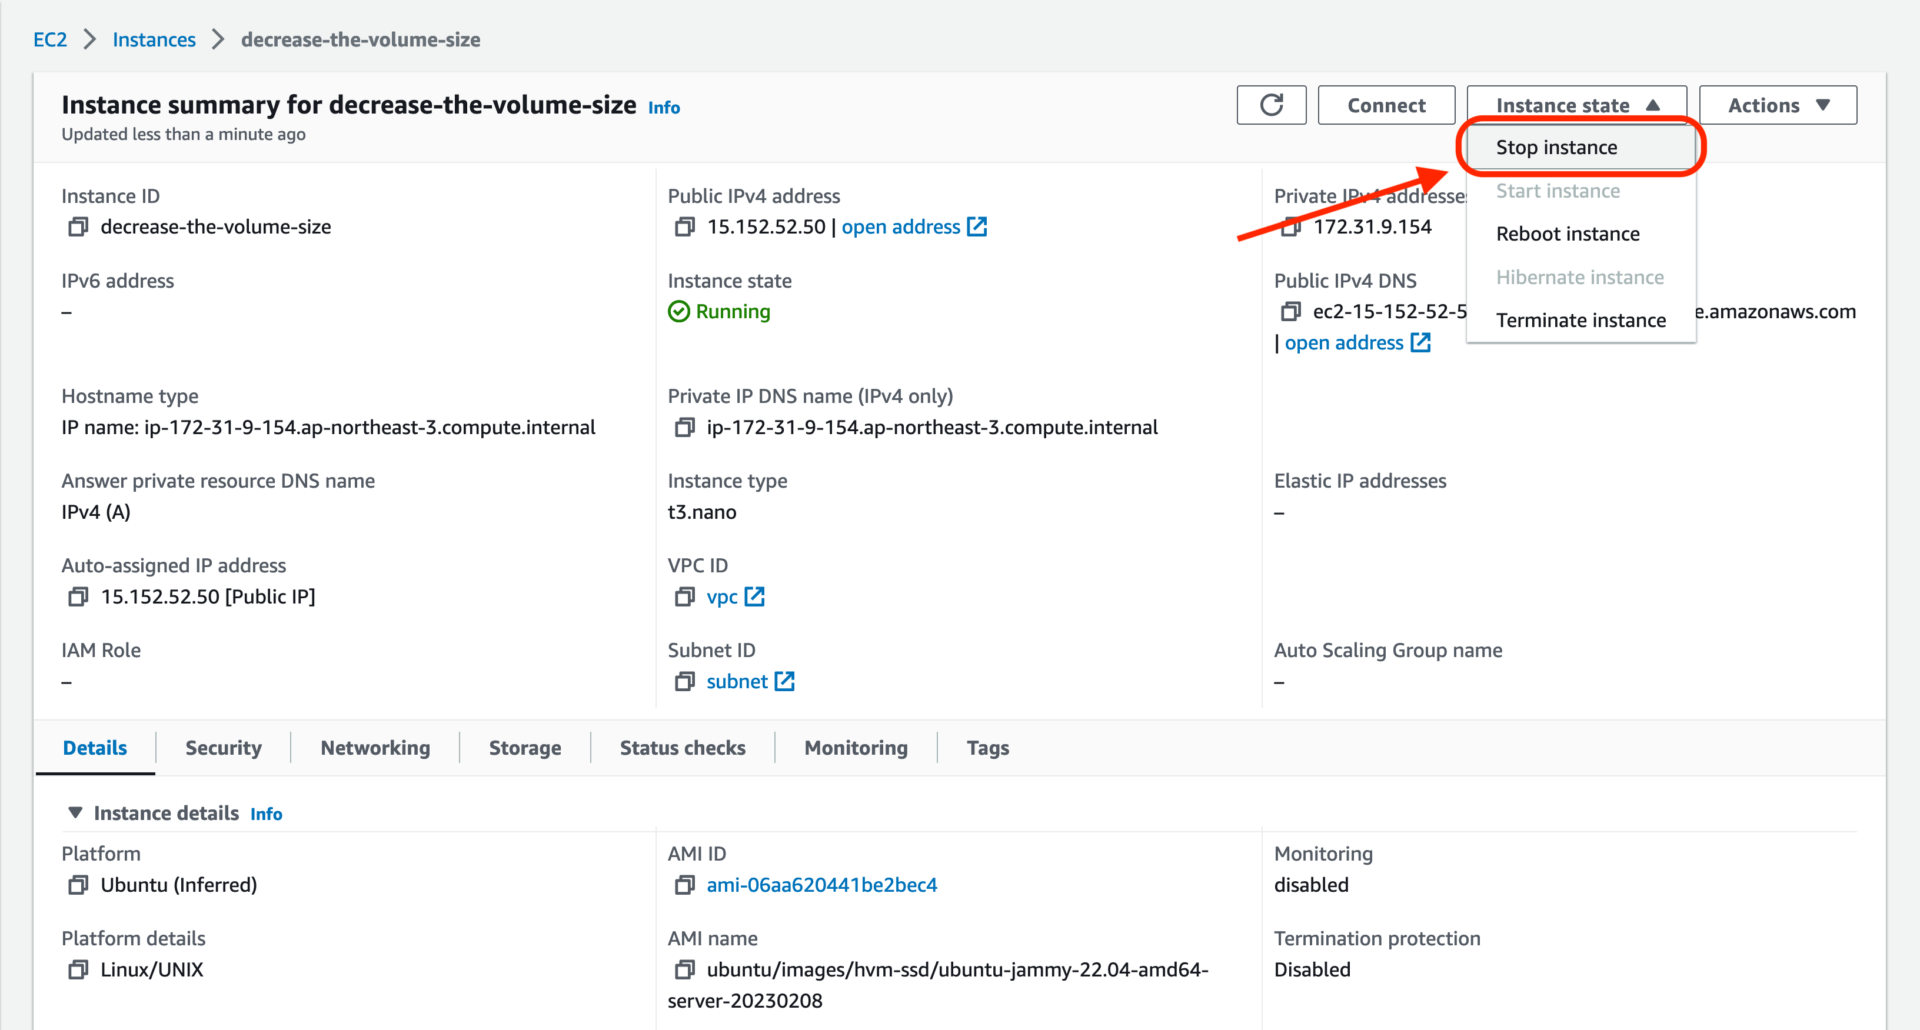
Step 1: Stop the EC2 instance.
⚠️ If your instance is providing an online service, it will become unavailable.
Step 2: Create a snapshot for your EC2 volume; the AWS document is here.
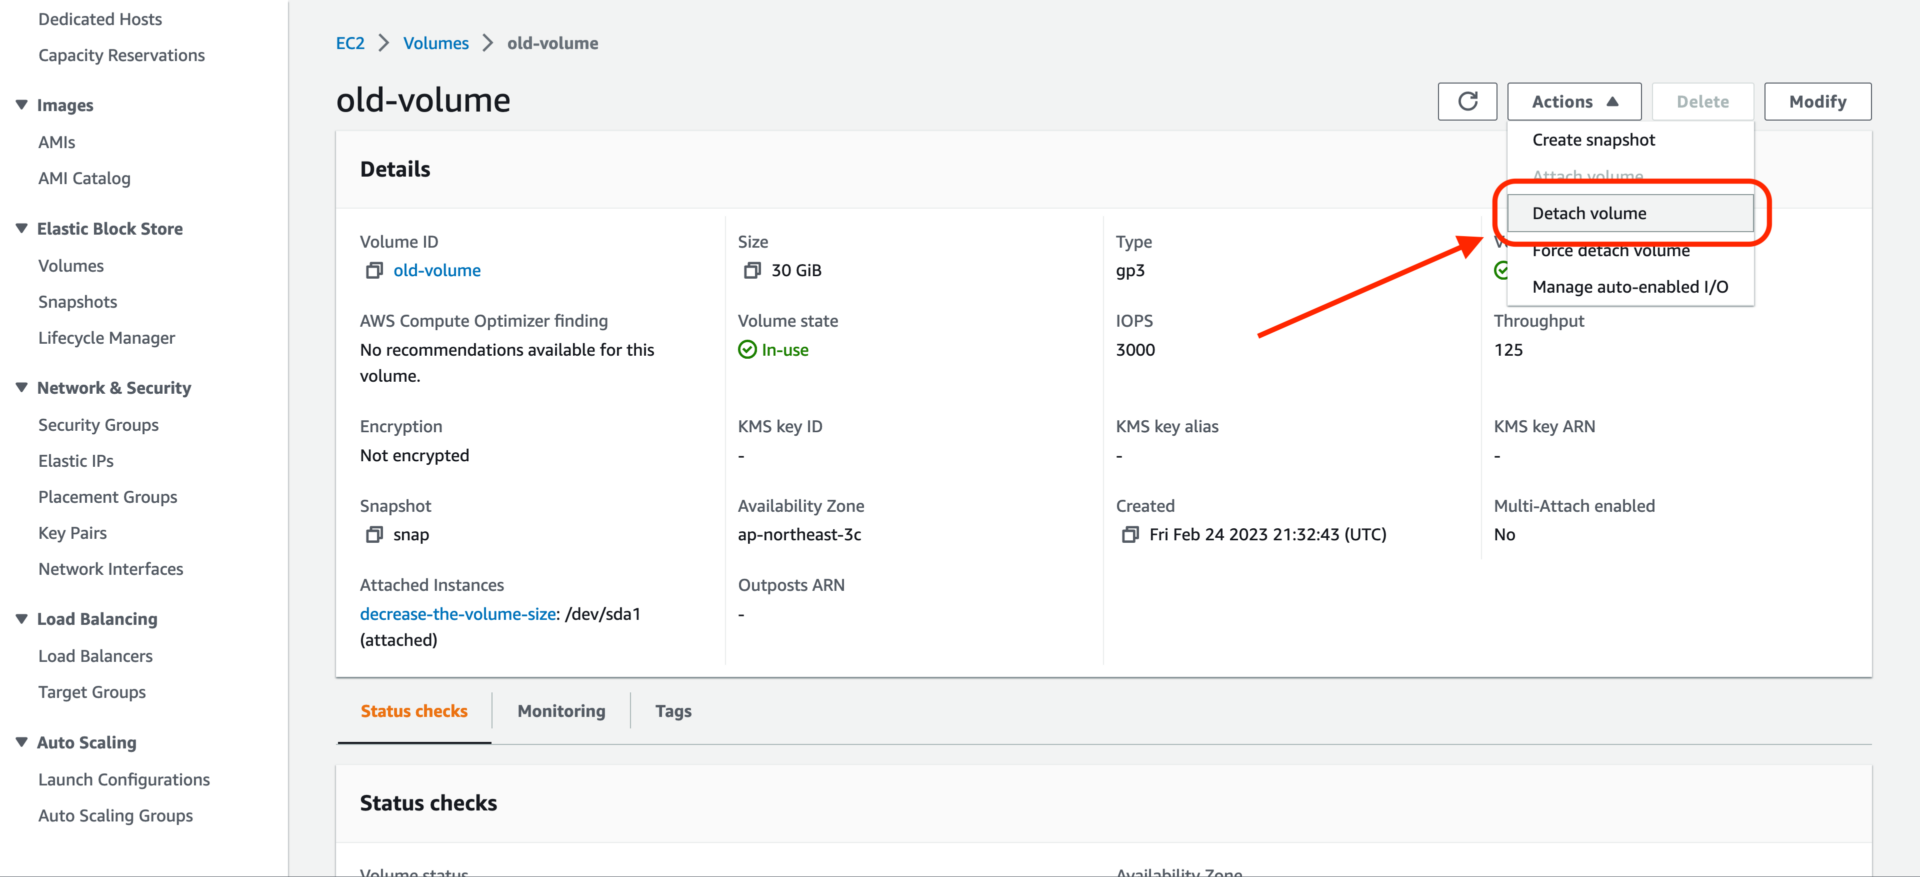
Step 3: Detach the volume from the EC2 instance.
Step 4: Launch two new instances; they must be in the same subnet as the original one. The first instance’s volume should be the desired size, 20GB in this tutorial, and set Delete on termination to No; the other instance is for copying data, and you only need to change the subnet config when launching.
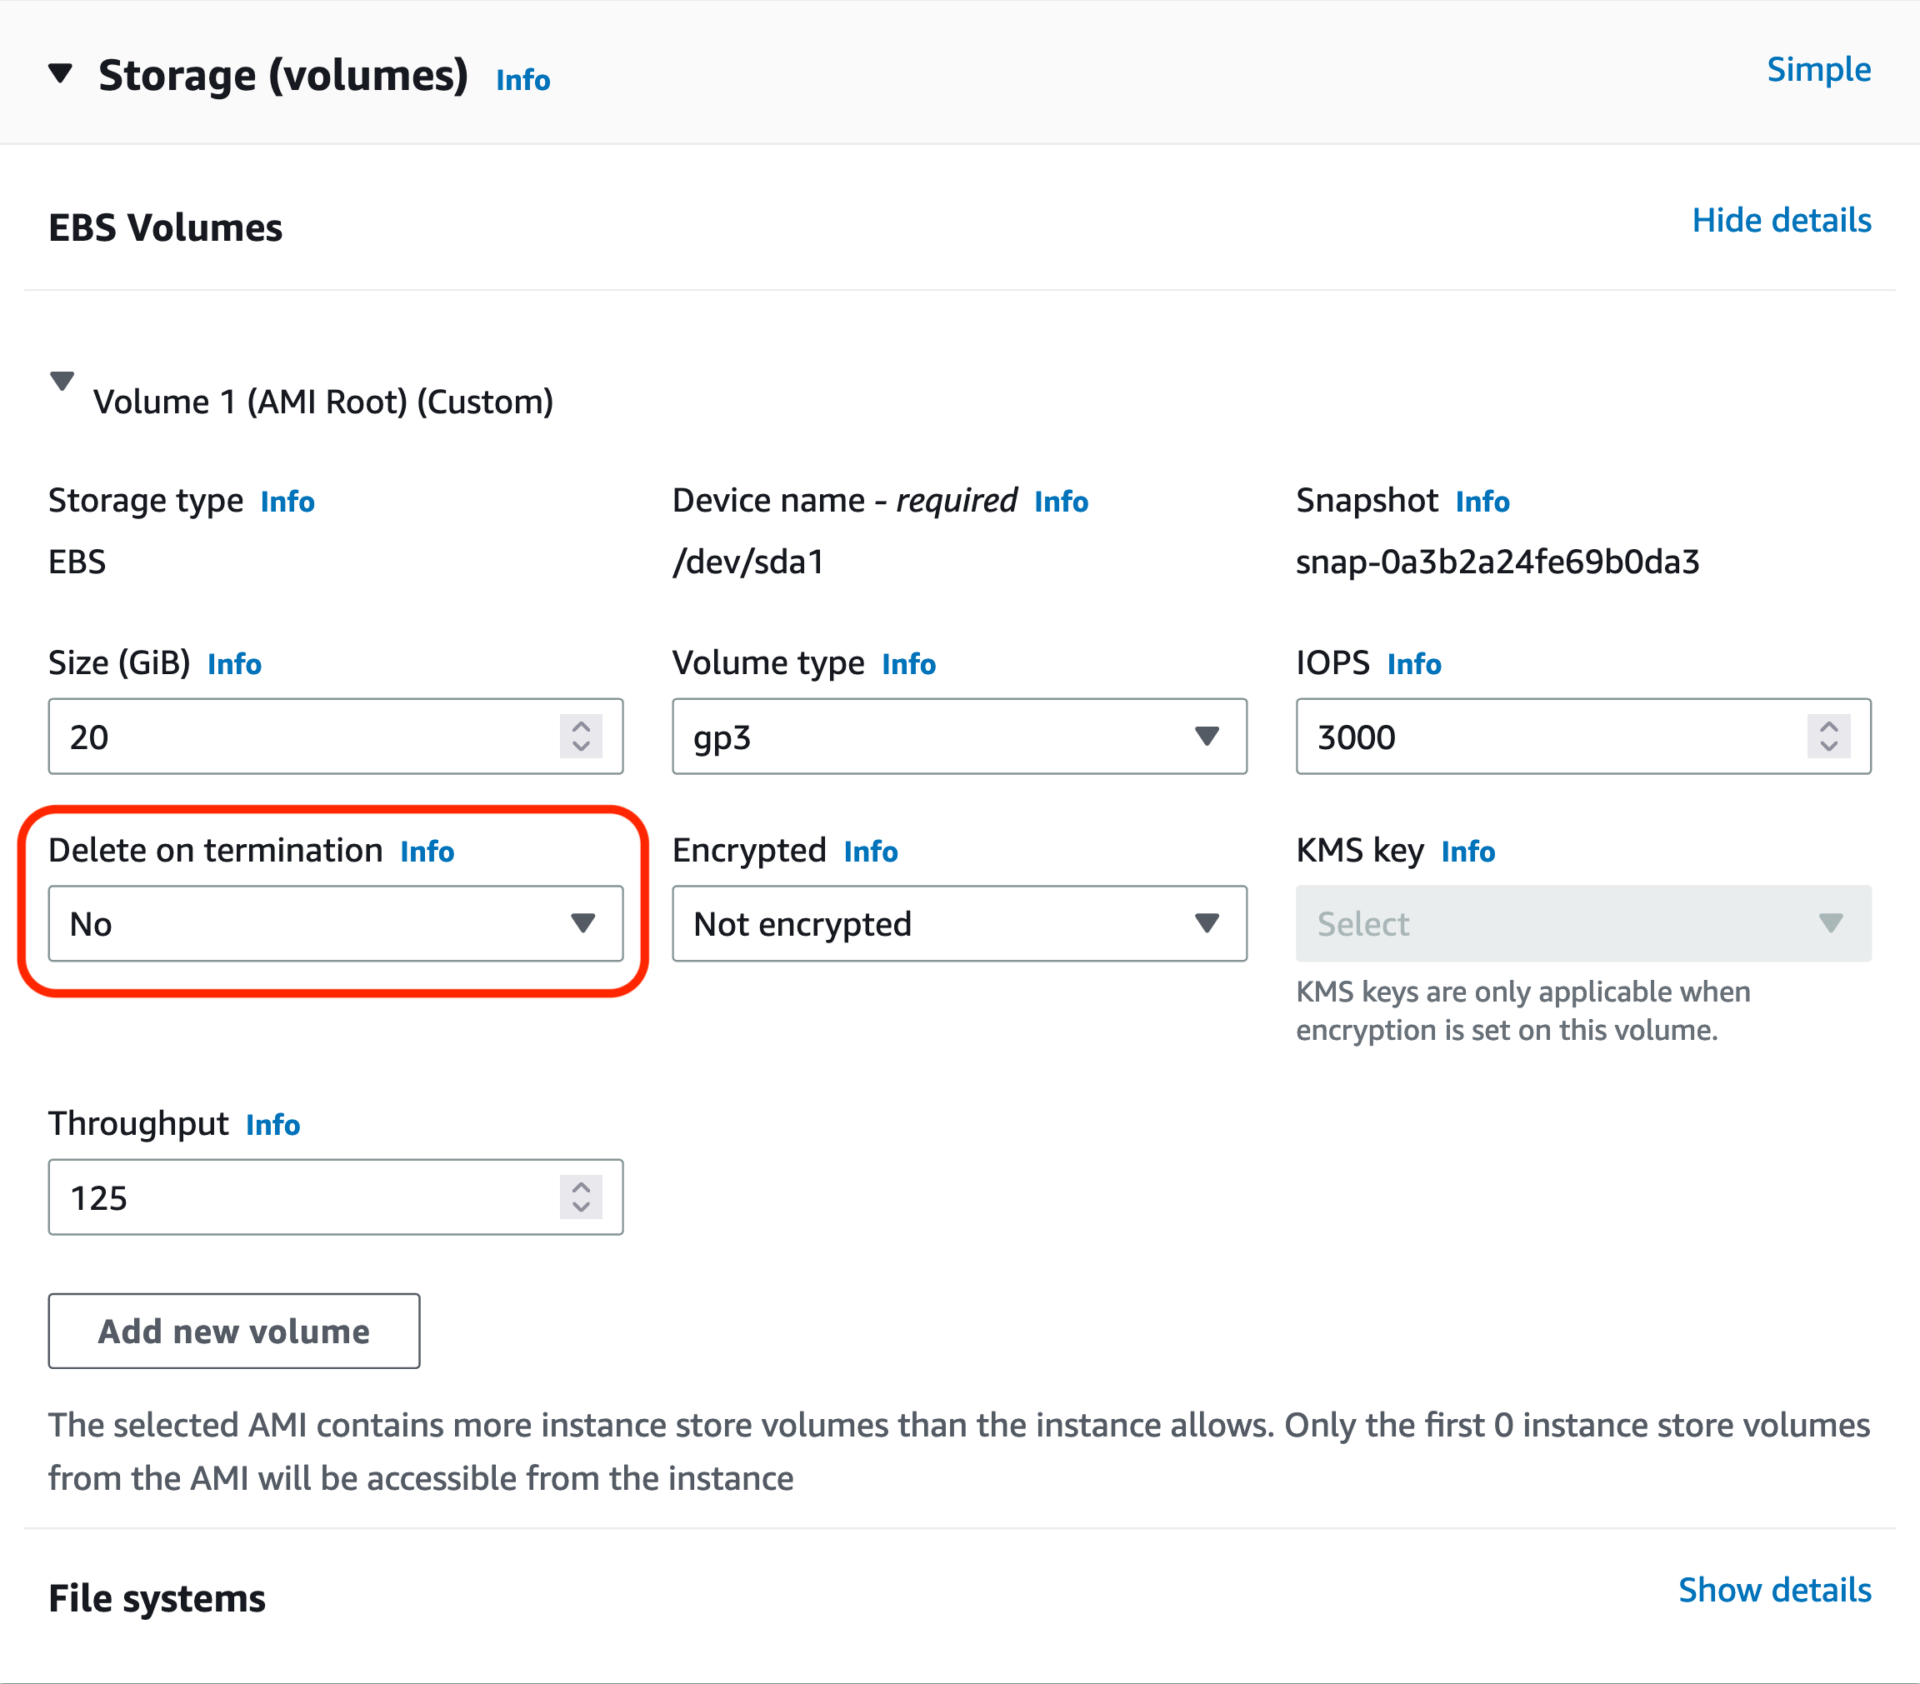
Delete on termination to No for the desired size instance.Now, you will have three instances. The first one is your original instance which is subjected to change the volume size(I named it decrease-the-volume-size). The second one is the desired size of your new volume(I named it instance-with-20GB-volume). The third one is used for copying data(I named it copy).
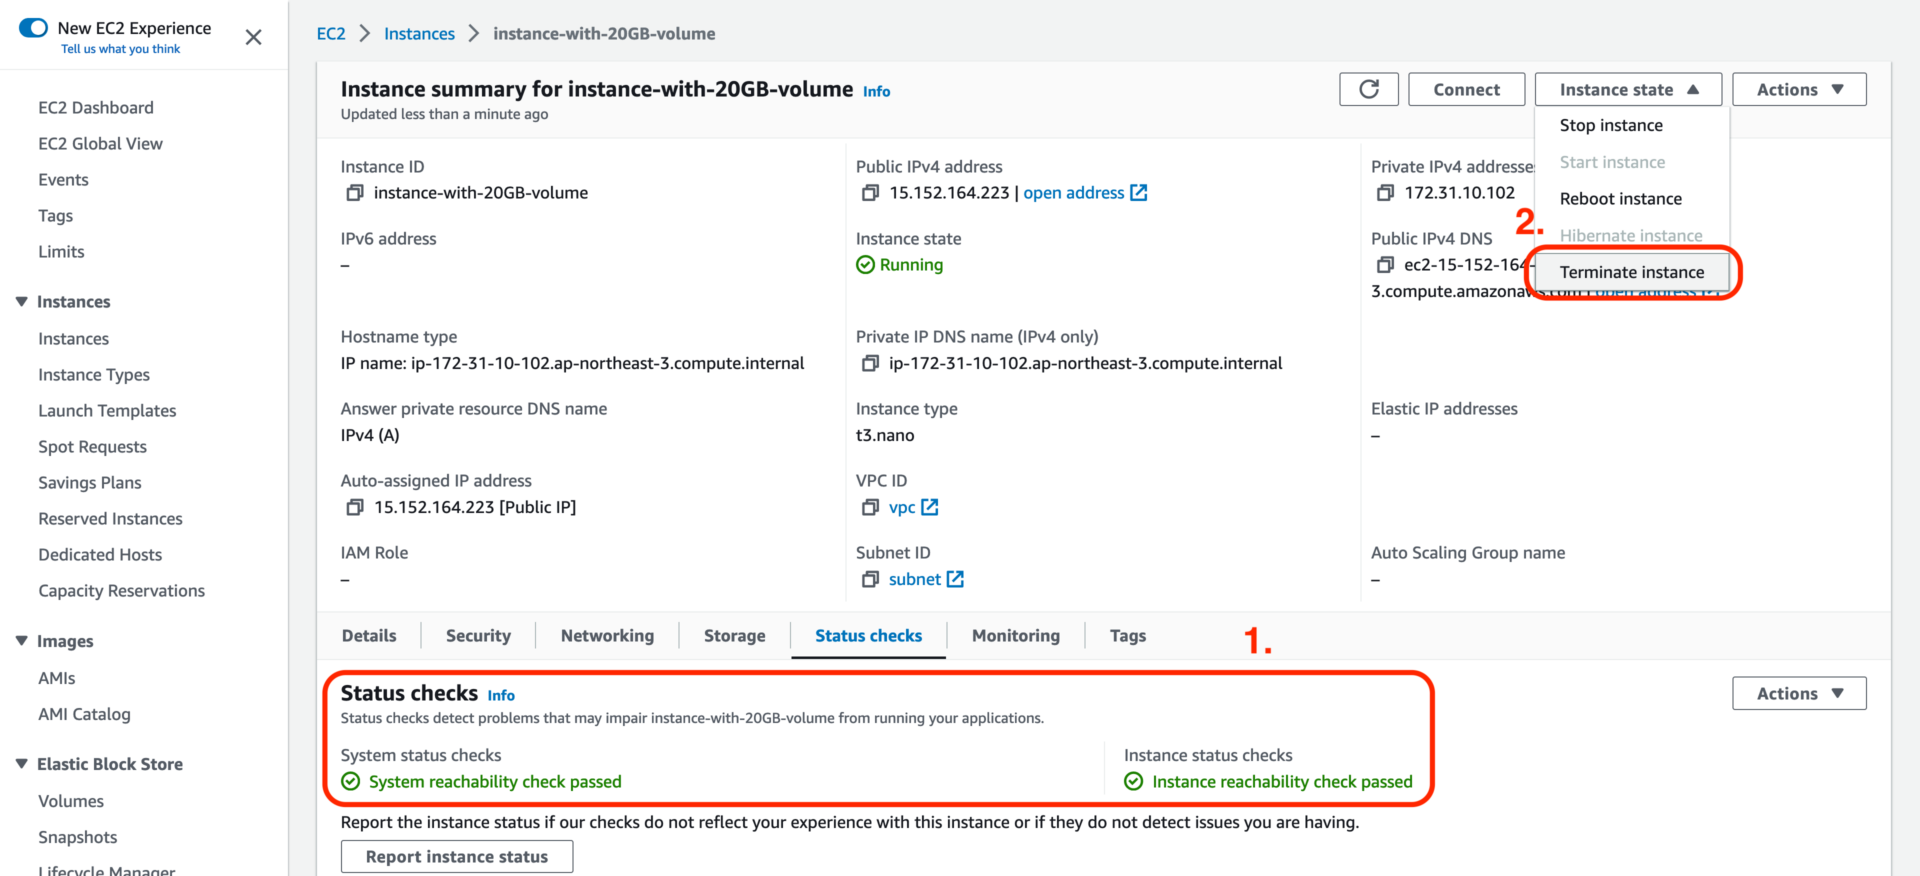
Step 5: Terminate the instance-with-20GB-volume instance after the status checks pass.
Step 6: Attach decrease-the-volume-size and instance-with-20GB-volume volumes to the copy instance. Ensuring the decrease-the-volume-size volume is attached before instance-with-20GB-volume.


Step 7: SSH into the copy instance.
Step 8: Change to the root user, or you can use sudo.
sudo su -lStep 9: Change the current directory to /mnt.
cd /mntStep 10: Create source and target directories. The source directory is used for decrease-the-volume-size volume, and the target directory is used for instance-with-20GB-volume volume.
mkdir source && mkdir targetStep 11: Use lsblk to list all block devices, and remember the names of decrease-the-volume-size and instance-with-20GB-volume volume.
lsblk -o NAME,FSTYPE,SIZE,MOUNTPOINT,LABEL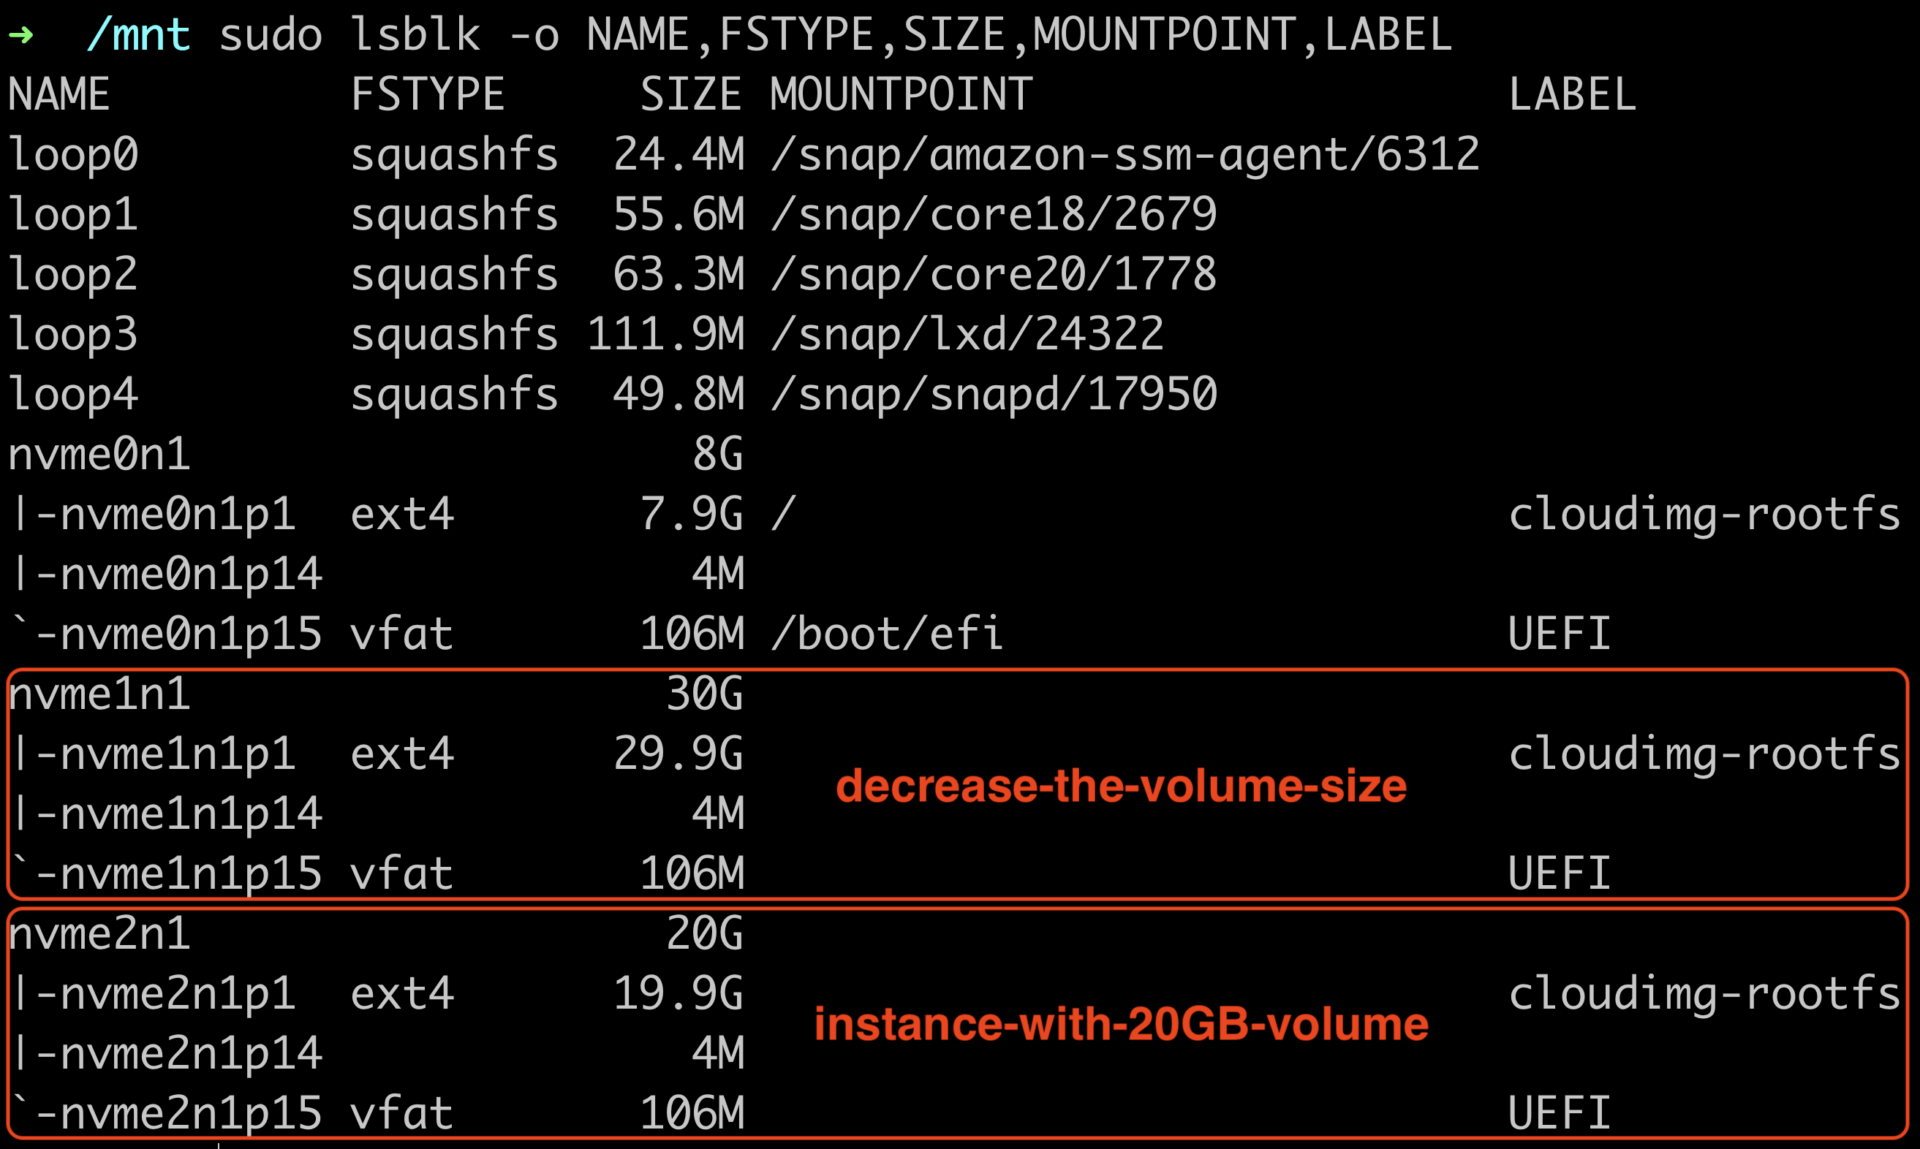
lsblk result.Step 12: Use mount to mount volumes; ensure you mount decrease-the-volume-size to source and instance-with-20GB-volume to target.
mount -t ext4 /dev/nvme1n1p1 /mnt/source
mount -t vfat /dev/nvme1n1p15 /mnt/source/boot/efi
mount -t ext4 /dev/nvme2n1p1 /mnt/target
mount -t vfat /dev/nvme2n1p15 /mnt/target/boot/efi
Step 13: Use df to check the mount commands result.

Step 14: Use rm to remove target directory content.
rm -rf /mnt/target/* /mnt/target/boot/efi/*Double check the previous steps are all correctly, otherwise, you may delete the wrong files.
The rm command will show rm: cannot remove '/mnt/target/boot/efi': Device or resource busy; this is an intended behavior.
Step 15: Use rsync to copy your original files to the new volume. Depending on how many files you have, this may take a few minutes to a few hours.
rsync -aHAXxSP /mnt/source/ /mnt/targetThe ending slash is important.
rsync -aHAXxSP /mnt/source/boot/efi/ /mnt/target/boot/efiThe ending slash is important.
Step 16: We copied all files to the new volume. However, the UUID of the block device in the file will not match the actual UUID of the block device. We need to replace them. Use blkid to list block device attributes.
blkid --match-token LABEL="cloudimg-rootfs"Step 17: Change the current directory to /mnt/target/boot.
cd /mnt/target/bootStep 18: Replace the old UUID and PARTUUID, and use the following table’s values as the example commands.
| Block Device | UUID | PARTUUID |
/dev/nvme1n1p1 (decrease-the-volume-size) | ccba481b-0dfa-494e-8a6e-13bfd79664eb | 30fb927d-1e5c-49a7-98e4-b3eebda90ad1 |
/dev/nvme2n1p1 (instance-with-20GB-volume) | da30b377-cf60-44b5-bd90-315ea90de6a8 | 2b57dc91-595c-4cad-9e6e-81cdd0c631ea |
find . -type f -exec sed -i "s/ccba481b-0dfa-494e-8a6e-13bfd79664eb/da30b377-cf60-44b5-bd90-315ea90de6a8/g" {} +find . -type f -exec sed -i "s/30fb927d-1e5c-49a7-98e4-b3eebda90ad1/2b57dc91-595c-4cad-9e6e-81cdd0c631ea/g" {} +Step 19: Update the PARTUUID value in the 40-force-partuuid.cfg file.
cd /mnt/target/etc/default/grub.dfind . -type f -exec sed -i "s/30fb927d-1e5c-49a7-98e4-b3eebda90ad1/2b57dc91-595c-4cad-9e6e-81cdd0c631ea/g" {} +Step 20: Use umount to unmount all devices.
umount /mnt/target/boot/efi /mnt/source/boot/efi /mnt/target /mnt/sourceStep 21: Shut down the instance.
shutdown -h nowStep 22: Detach the decrease-the-volume-size and instance-with-20GB-volume volumes from the copy instance.
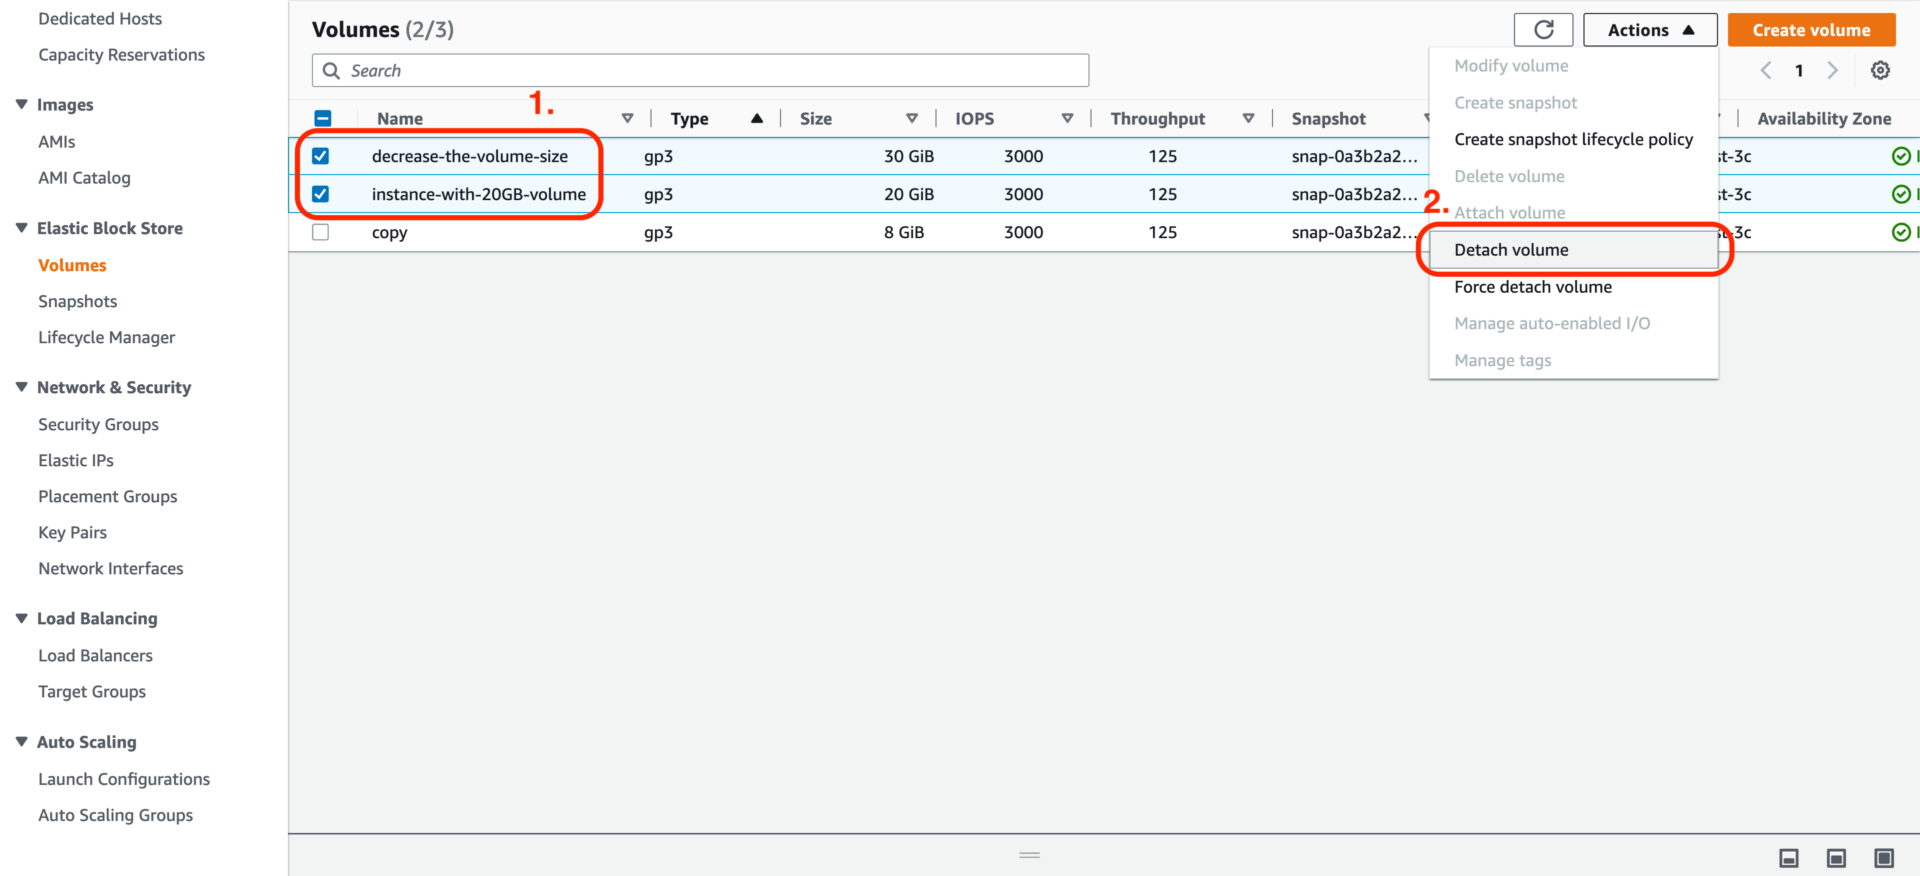
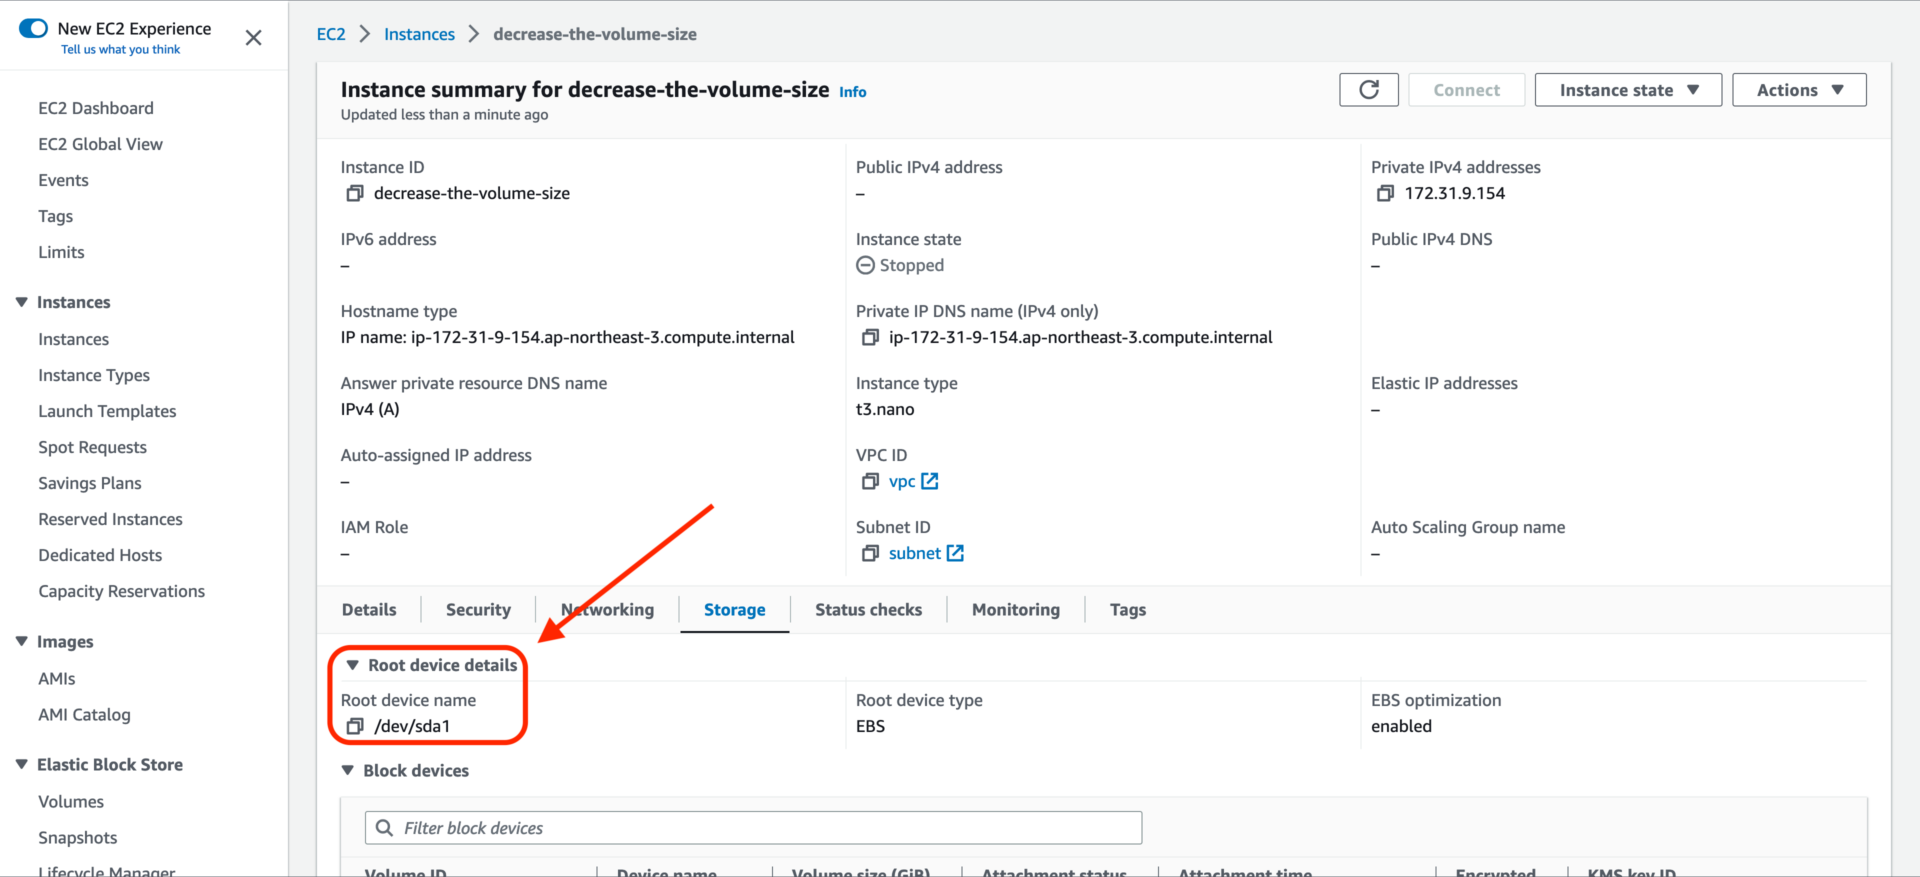
Step 23: Attach the instance-with-20GB-volume volume to the original instance(decrease-the-volume-size). Ensure the Device name is the same as Root device name.

Step 24: Start the original instance(decrease-the-volume-size).
Step 25: Use df to check the disk size.

Step 26: You can delete all old volumes and terminate the copy instance if everything works correctly.
That’s all.
During the research, many articles help me a lot. Without them, I may need to spend more time finding a solution. If you find my article useful, don’t forget also to give it a vote. Thanks for your reading.
References: