
On the AWS EC2 instance, increasing the volume is an easy task. You only need to adjust the size in the AWS management console and then extend the file system. That’s all. It is straightforward. There is also a step-by-step tutorial on the AWS document. However, decreasing an existing volume can become a nightmare.
You will feel helpless if you have to use Google to search for related problems. Many articles discuss this issue; however, almost none can work without issues, and I have also suffered from this before.
After reading many articles and doing lots of research, I finally managed to decrease the EC2 volume successfully and verified that it was working on an existing instance. I hope this article will save your life.
💡 The tutorial was only tested on Ubuntu Server 22.04; other OS or versions may not work and may encounter issues.
In this tutorial, we will demonstrate how to reduce the size of an Amazon EC2 volume from 30GB to 20GB on an Ubuntu Server 22.04. Our approach involves creating two auxiliary storage instances and utilizing them to transfer the data. Subsequently, we will modify the boot configuration to guarantee a successful startup when the disk is mounted back to the original instance.
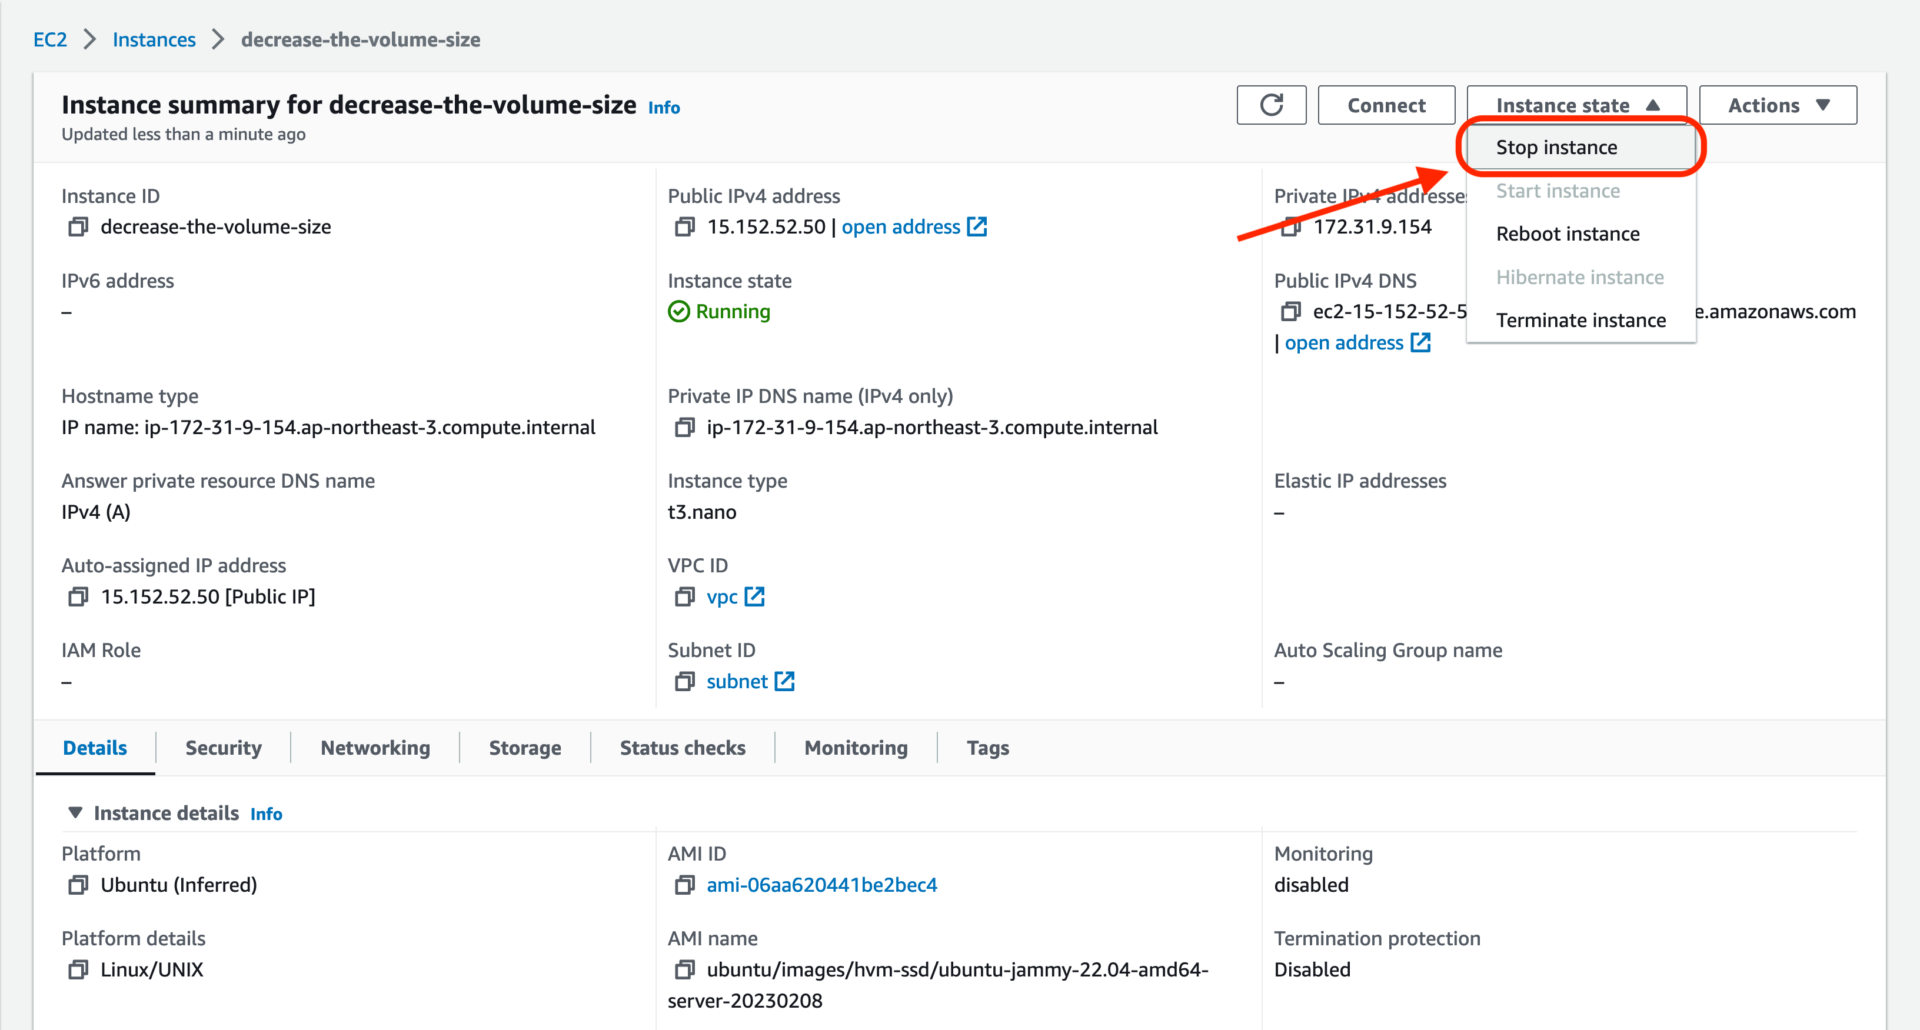
Step 1: Stop the EC2 instance.
⚠️ If your instance is providing an online service, it will become unavailable.
Step 2: Create a snapshot for your EC2 volume; the AWS document is here.
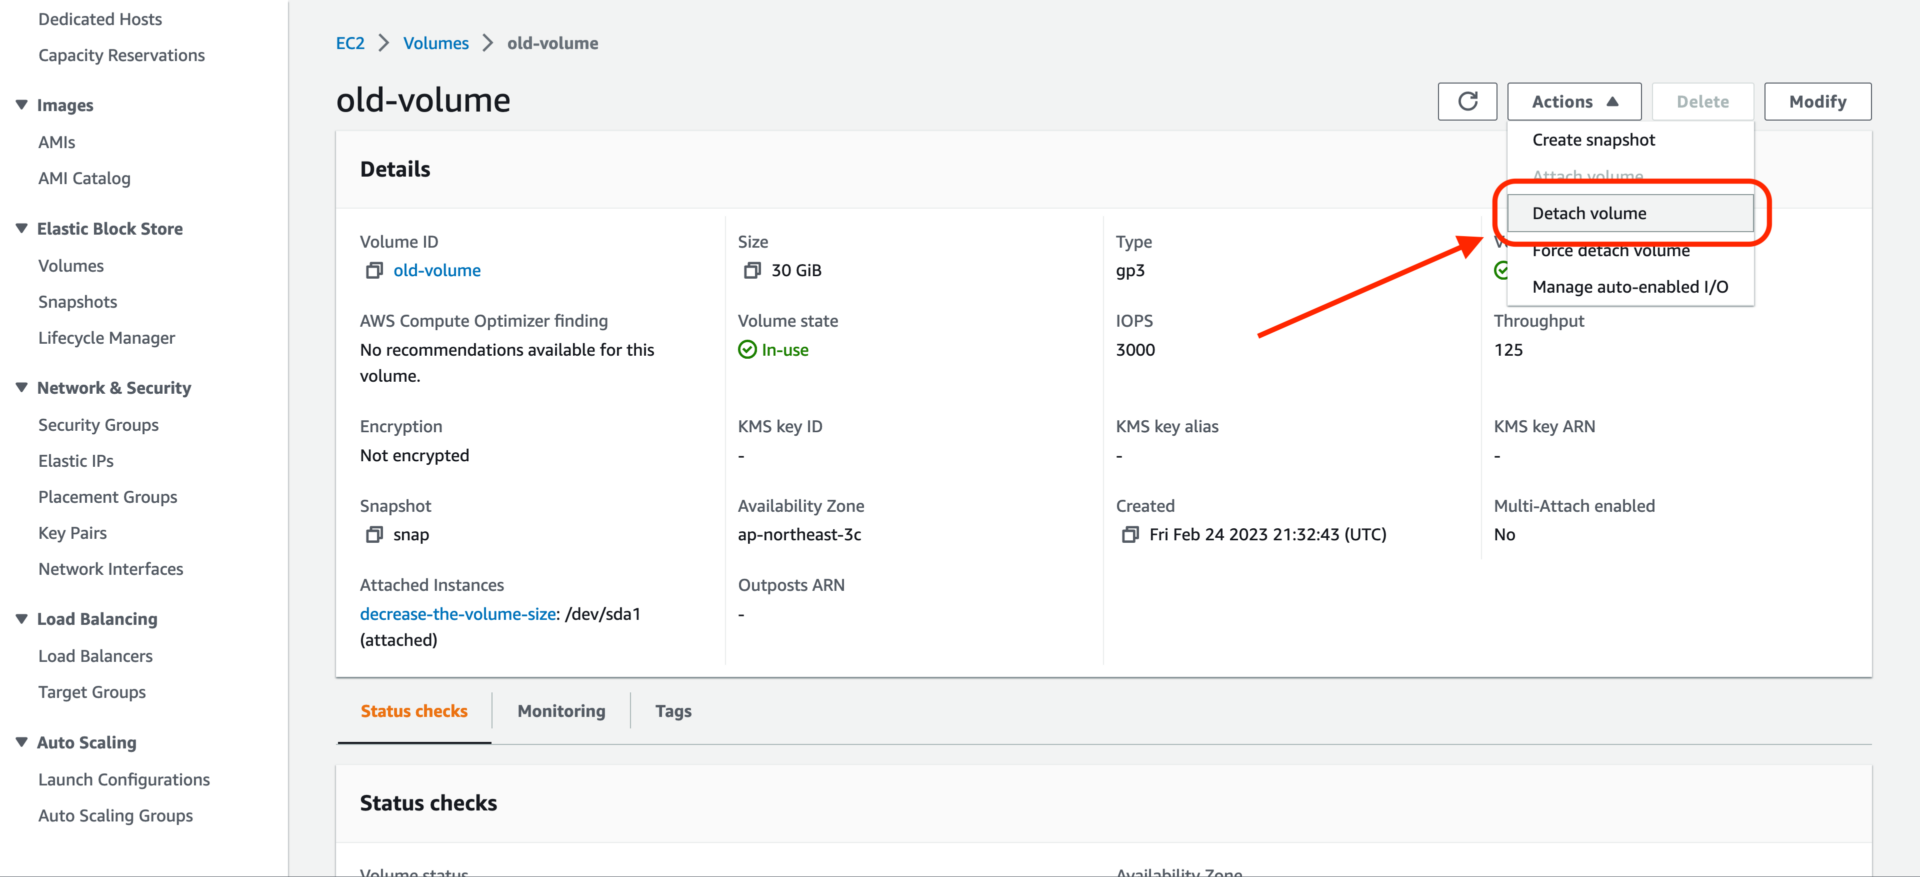
Step 3: Detach the volume from the EC2 instance.
Step 4: Launch two new instances; they must be in the same subnet as the original one. The first instance’s volume should be the desired size, 20GB in this tutorial, and set Delete on termination to No; the other instance is for copying data, and you only need to change the subnet config when launching.
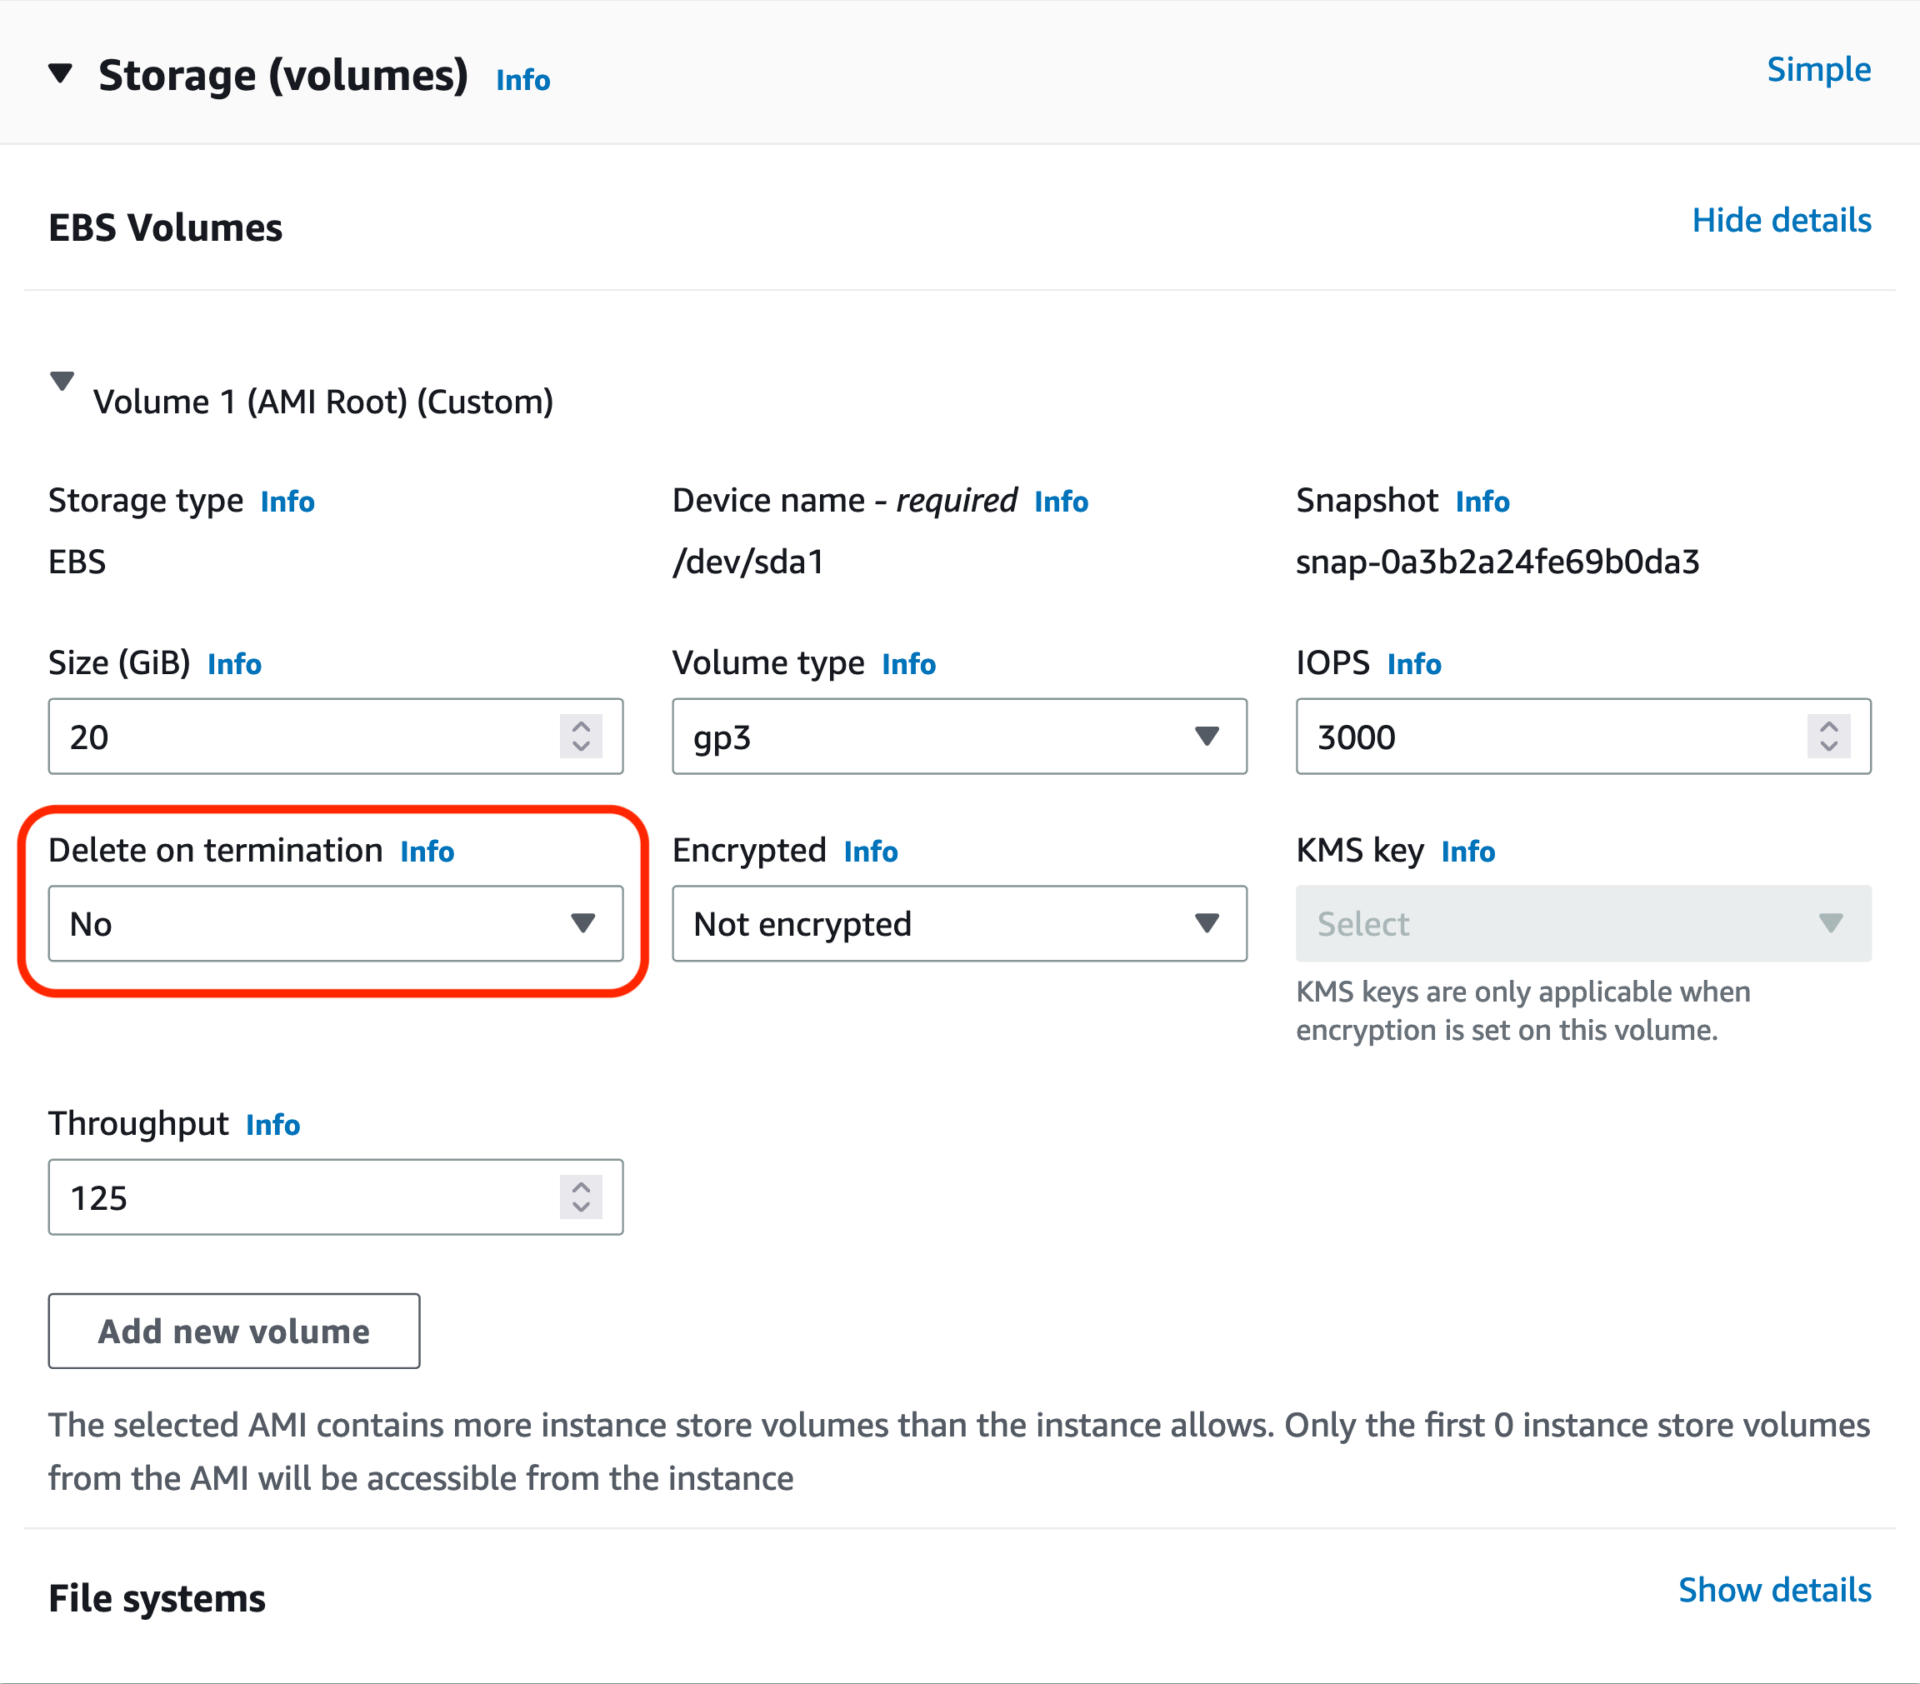
Delete on termination to No for the desired size instance.Now, you will have three instances. The first one is your original instance which is subjected to change the volume size(I named it decrease-the-volume-size). The second one is the desired size of your new volume(I named it instance-with-20GB-volume). The third one is used for copying data(I named it copy).
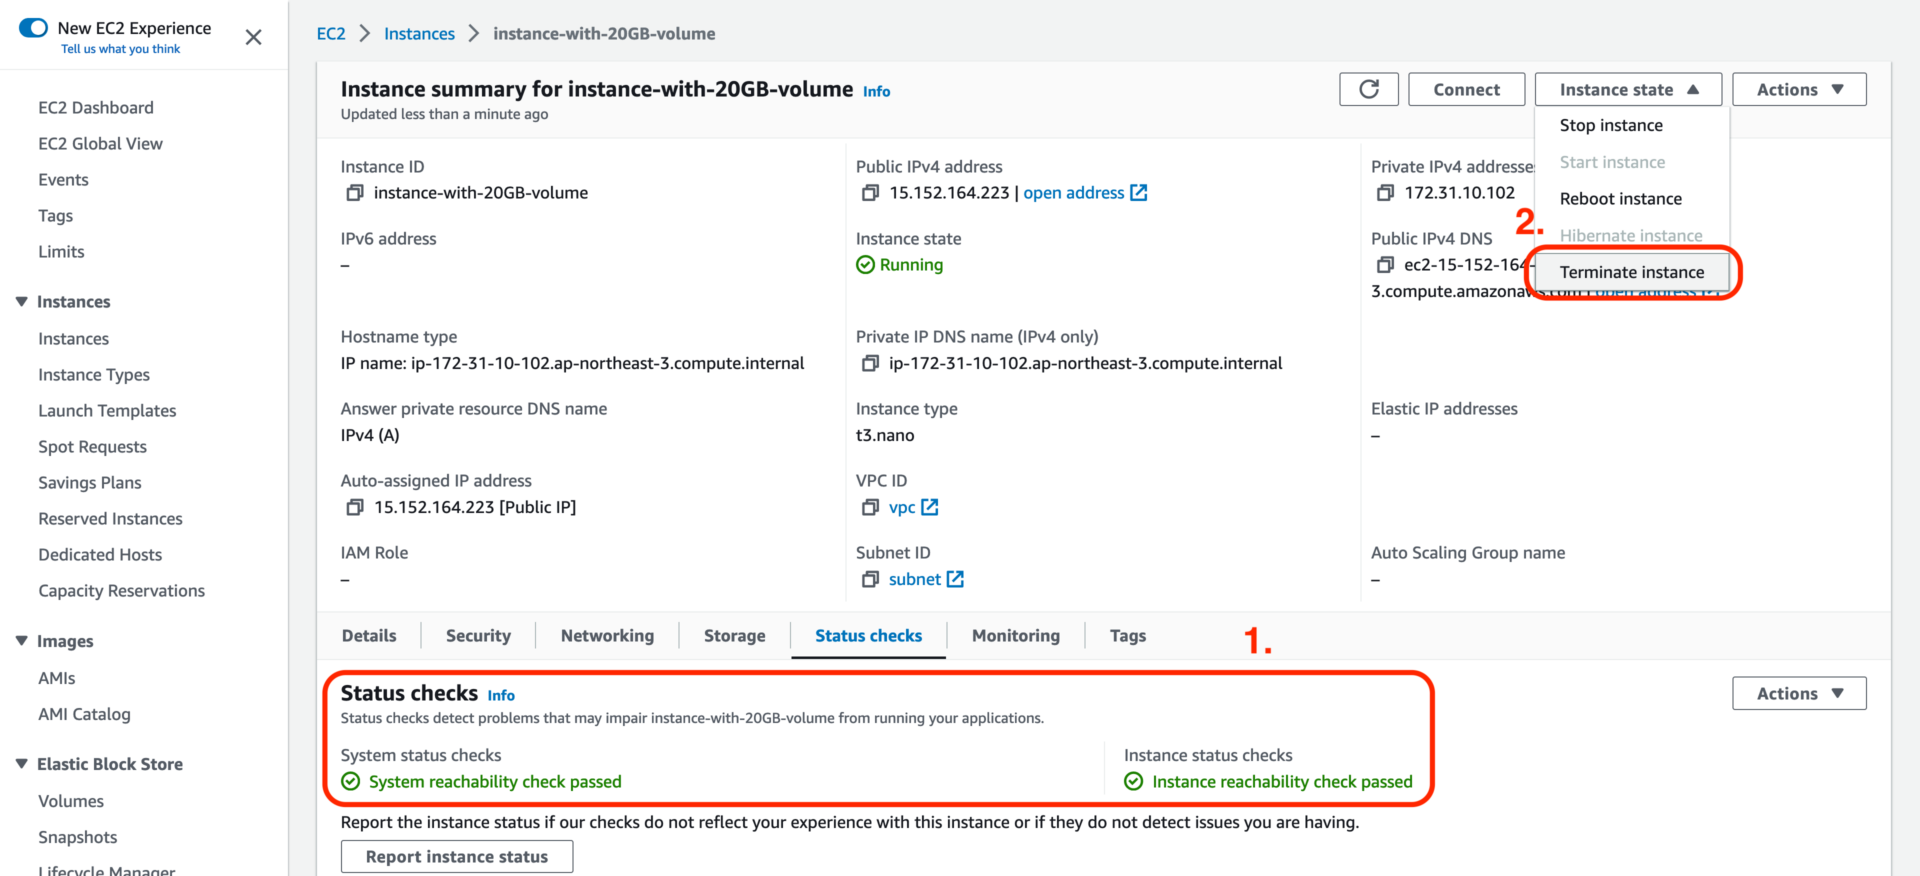
Step 5: Terminate the instance-with-20GB-volume instance after the status checks pass.
Step 6: Attach decrease-the-volume-size and instance-with-20GB-volume volumes to the copy instance. Ensuring the decrease-the-volume-size volume is attached before instance-with-20GB-volume.


Step 7: SSH into the copy instance.
Step 8: Change to the root user, or you can use sudo.
sudo su -lStep 9: Change the current directory to /mnt.
cd /mntStep 10: Create source and target directories. The source directory is used for decrease-the-volume-size volume, and the target directory is used for instance-with-20GB-volume volume.
mkdir source && mkdir targetStep 11: Use lsblk to list all block devices, and remember the names of decrease-the-volume-size and instance-with-20GB-volume volume.
lsblk -o NAME,FSTYPE,SIZE,MOUNTPOINT,LABEL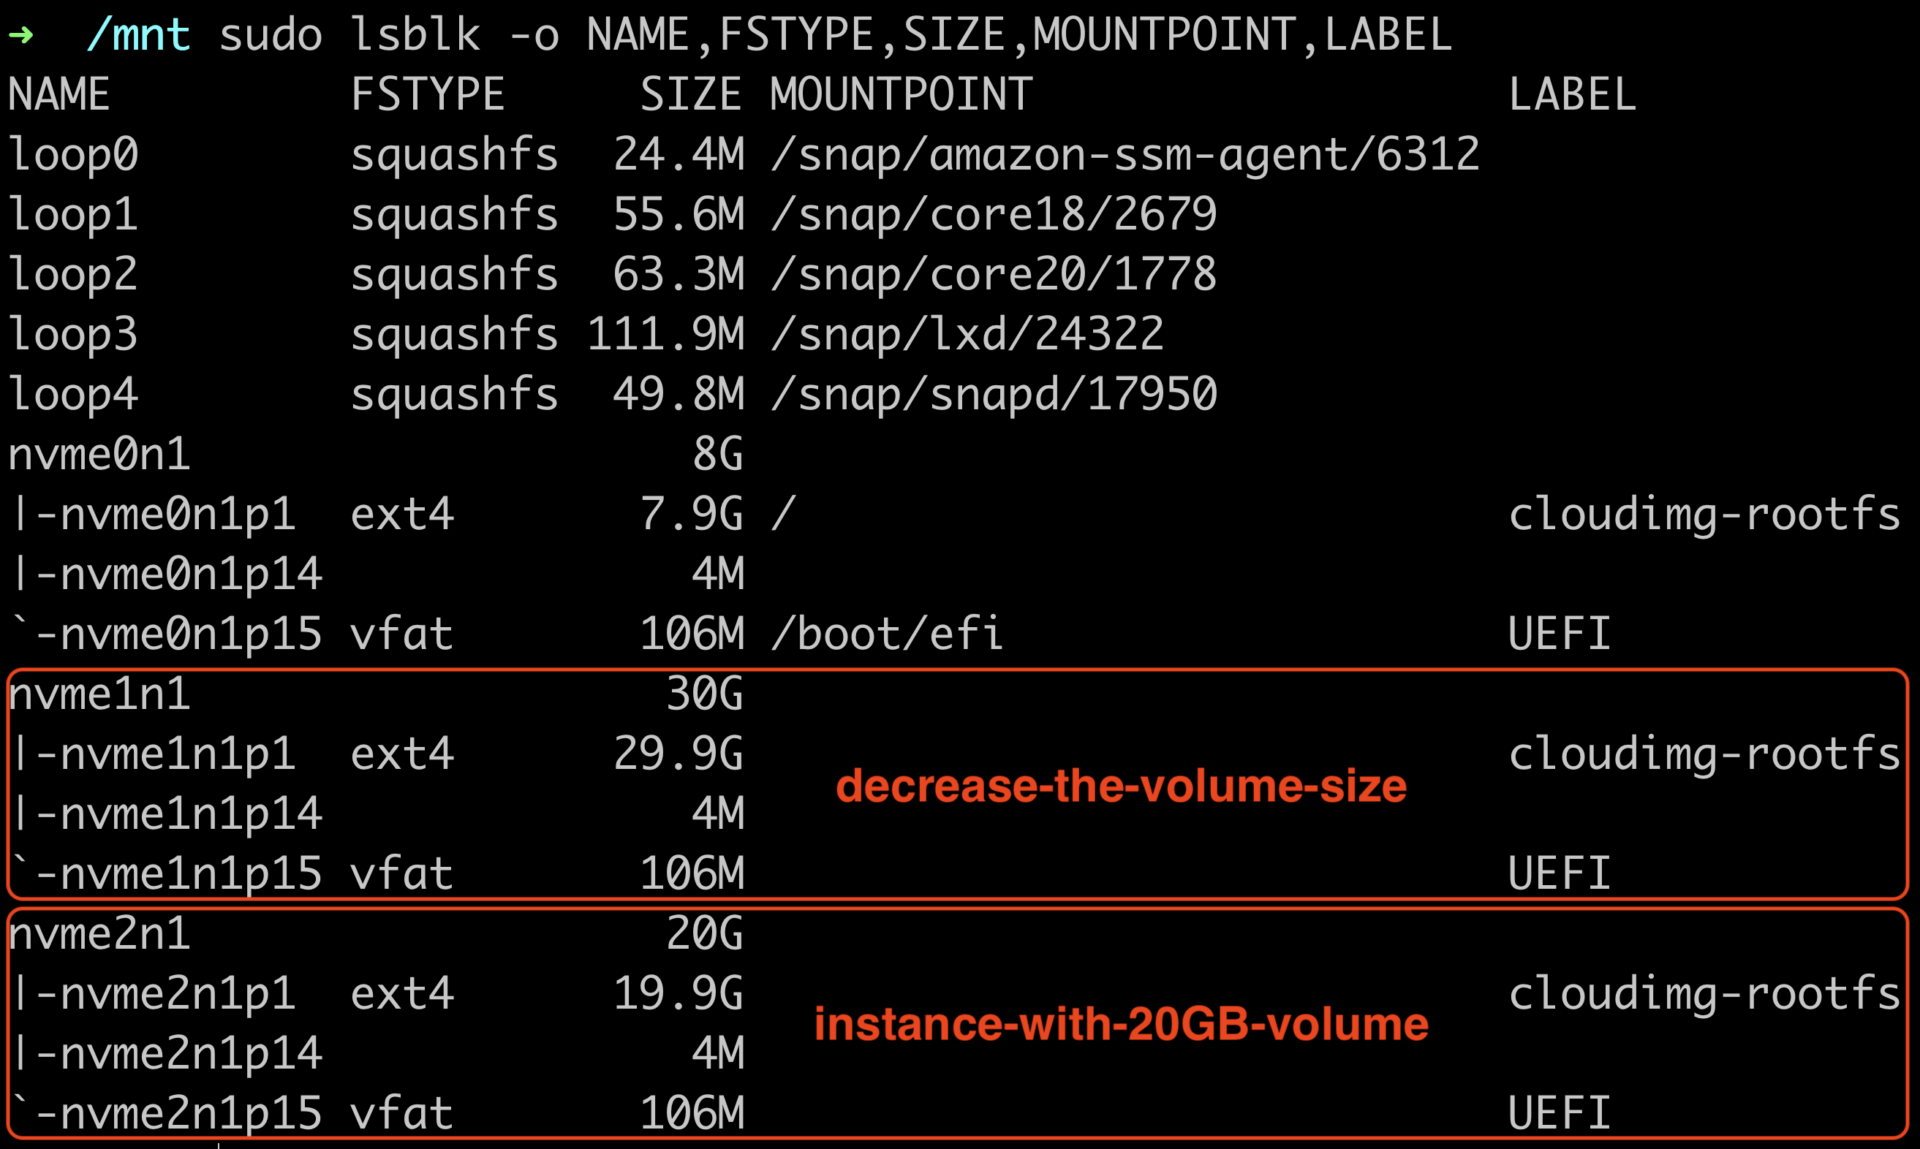
lsblk result.Step 12: Use mount to mount volumes; ensure you mount decrease-the-volume-size to source and instance-with-20GB-volume to target.
mount -t ext4 /dev/nvme1n1p1 /mnt/source
mount -t vfat /dev/nvme1n1p15 /mnt/source/boot/efi
mount -t ext4 /dev/nvme2n1p1 /mnt/target
mount -t vfat /dev/nvme2n1p15 /mnt/target/boot/efi
Step 13: Use df to check the mount commands result.

Step 14: Use rm to remove target directory content.
rm -rf /mnt/target/* /mnt/target/boot/efi/*Double check the previous steps are all correctly, otherwise, you may delete the wrong files.
The rm command will show rm: cannot remove '/mnt/target/boot/efi': Device or resource busy; this is an intended behavior.
Step 15: Use rsync to copy your original files to the new volume. Depending on how many files you have, this may take a few minutes to a few hours.
rsync -aHAXxSP /mnt/source/ /mnt/targetThe ending slash is important.
rsync -aHAXxSP /mnt/source/boot/efi/ /mnt/target/boot/efiThe ending slash is important.
Step 16: We copied all files to the new volume. However, the UUID of the block device in the file will not match the actual UUID of the block device. We need to replace them. Use blkid to list block device attributes.
blkid --match-token LABEL="cloudimg-rootfs"Step 17: Change the current directory to /mnt/target/boot.
cd /mnt/target/bootStep 18: Replace the old UUID and PARTUUID, and use the following table’s values as the example commands.
| Block Device | UUID | PARTUUID |
/dev/nvme1n1p1 (decrease-the-volume-size) | ccba481b-0dfa-494e-8a6e-13bfd79664eb | 30fb927d-1e5c-49a7-98e4-b3eebda90ad1 |
/dev/nvme2n1p1 (instance-with-20GB-volume) | da30b377-cf60-44b5-bd90-315ea90de6a8 | 2b57dc91-595c-4cad-9e6e-81cdd0c631ea |
find . -type f -exec sed -i "s/ccba481b-0dfa-494e-8a6e-13bfd79664eb/da30b377-cf60-44b5-bd90-315ea90de6a8/g" {} +find . -type f -exec sed -i "s/30fb927d-1e5c-49a7-98e4-b3eebda90ad1/2b57dc91-595c-4cad-9e6e-81cdd0c631ea/g" {} +Step 19: Update the PARTUUID value in the 40-force-partuuid.cfg file.
cd /mnt/target/etc/default/grub.dfind . -type f -exec sed -i "s/30fb927d-1e5c-49a7-98e4-b3eebda90ad1/2b57dc91-595c-4cad-9e6e-81cdd0c631ea/g" {} +Step 20: Use umount to unmount all devices.
umount /mnt/target/boot/efi /mnt/source/boot/efi /mnt/target /mnt/sourceStep 21: Shut down the instance.
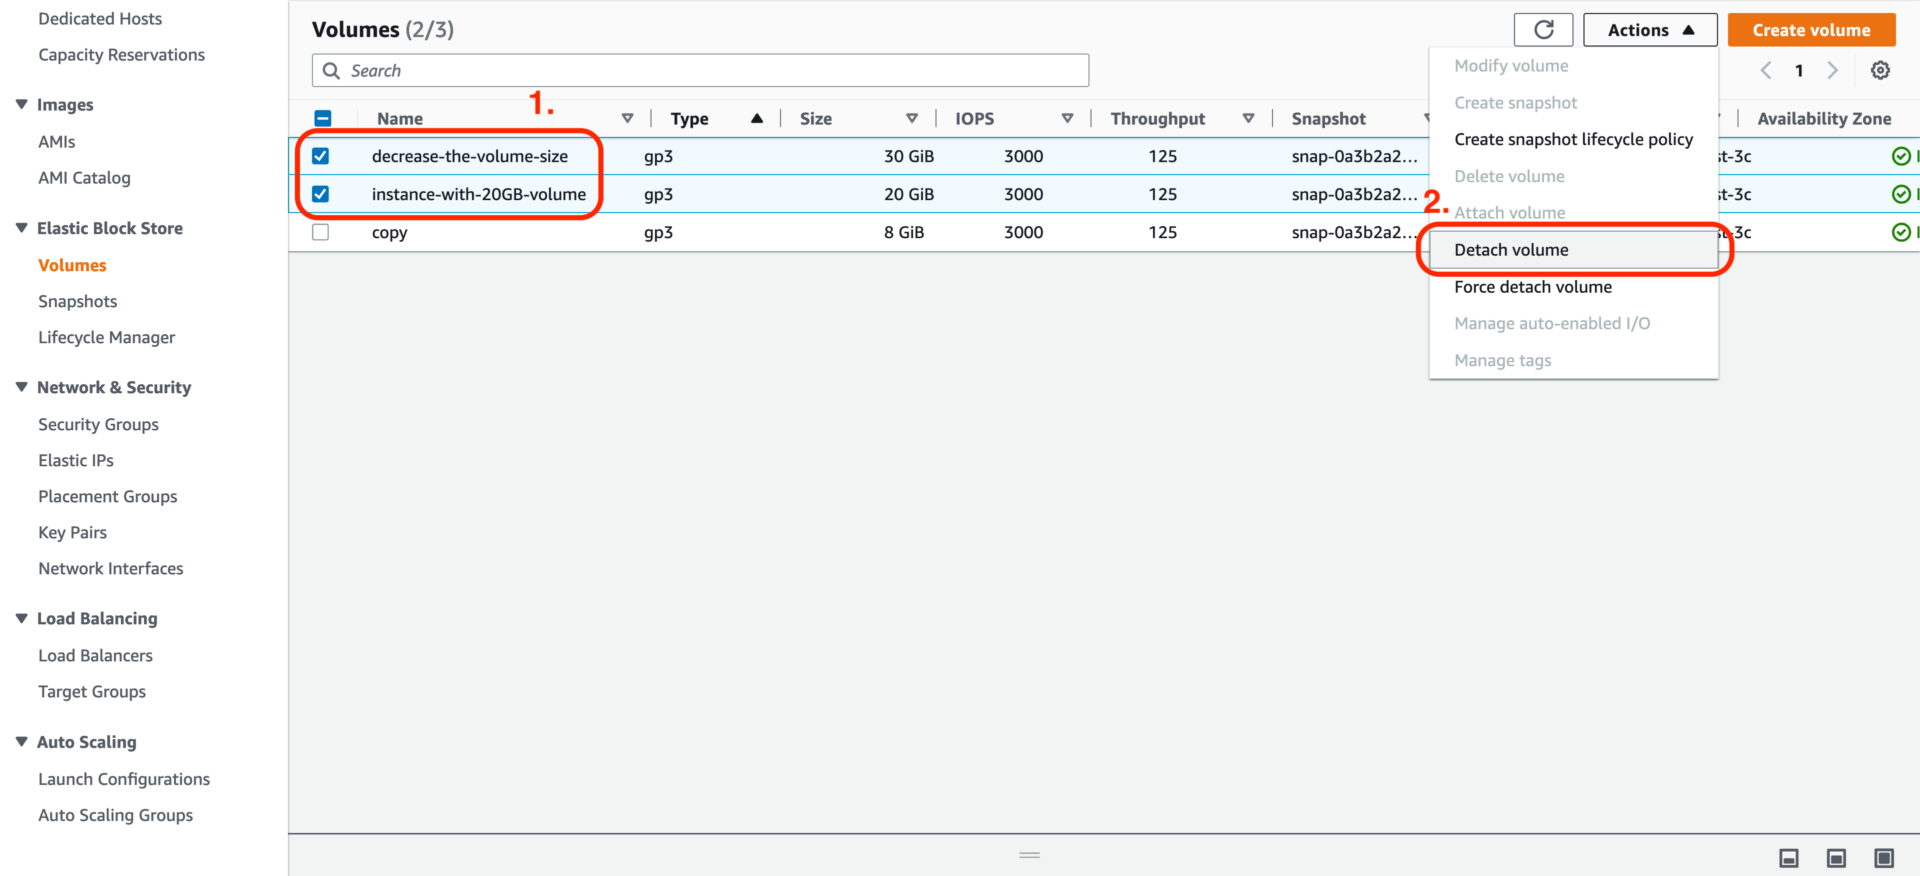
shutdown -h nowStep 22: Detach the decrease-the-volume-size and instance-with-20GB-volume volumes from the copy instance.
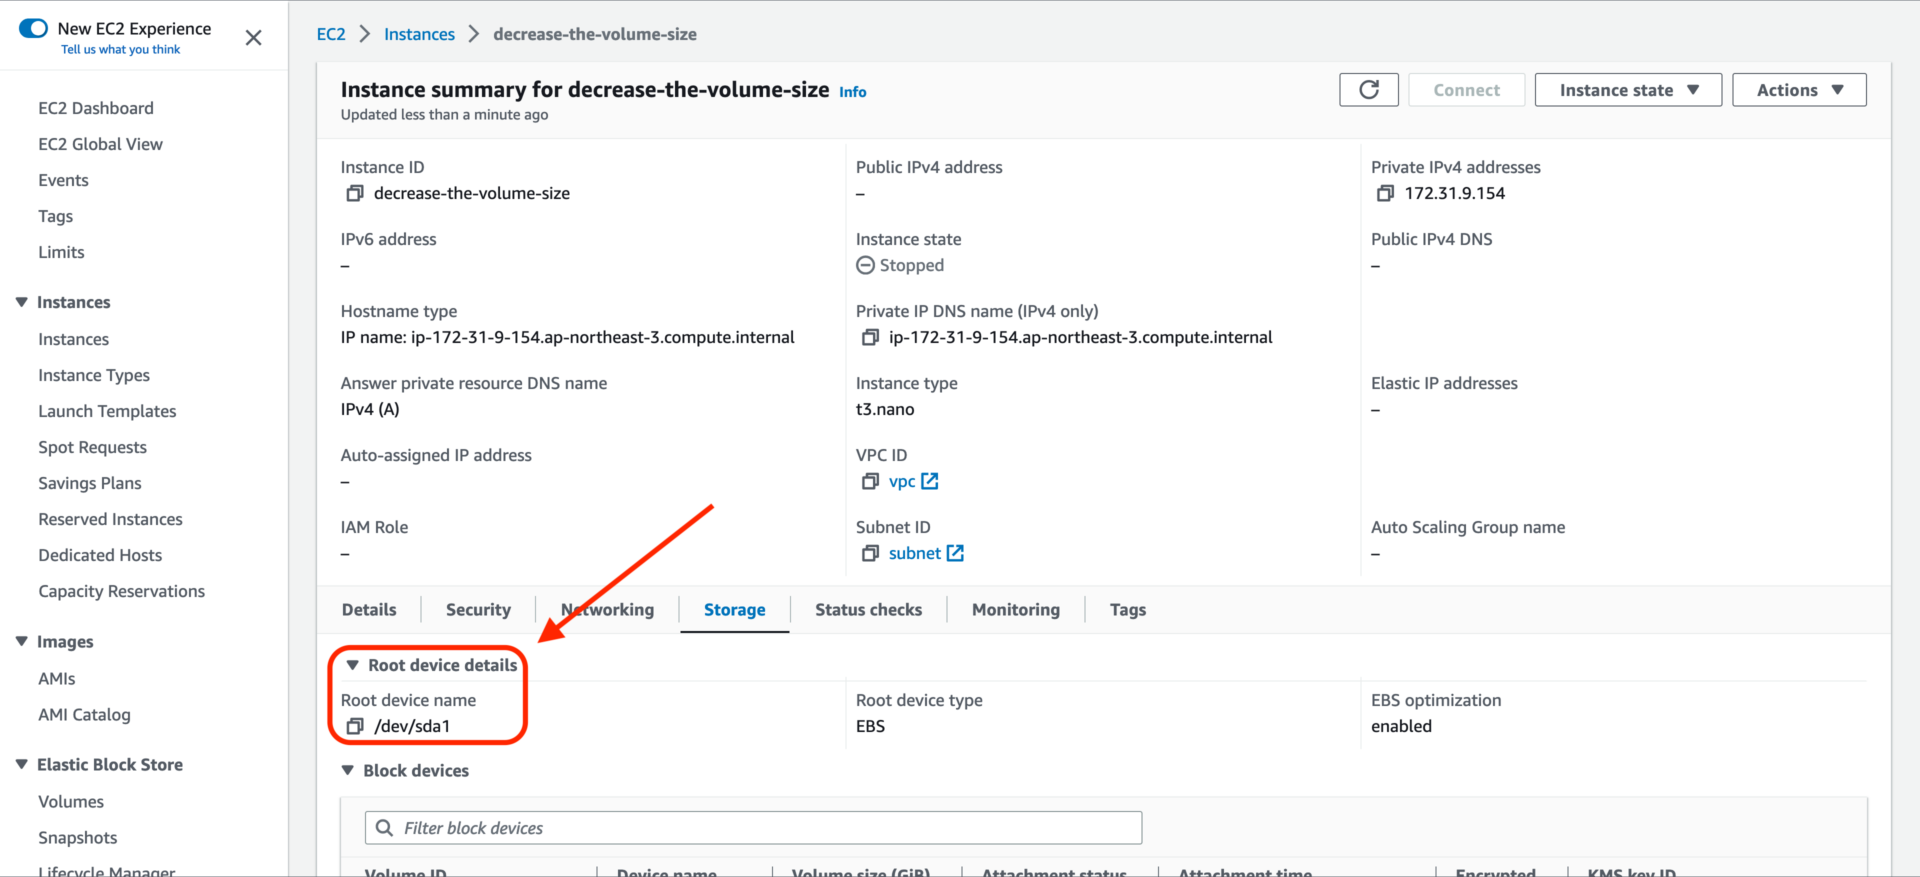
Step 23: Attach the instance-with-20GB-volume volume to the original instance(decrease-the-volume-size). Ensure the Device name is the same as Root device name.

Step 24: Start the original instance(decrease-the-volume-size).
Step 25: Use df to check the disk size.

Step 26: You can delete all old volumes and terminate the copy instance if everything works correctly.
That’s all.
During the research, many articles help me a lot. Without them, I may need to spend more time finding a solution. If you find my article useful, don’t forget also to give it a vote. Thanks for your reading.
References: